The Making of a Junk Garden Vignette
May 22, 2014
The first step in making a great junk garden vignette is to find some cool junk! (I have plenty!)
I move my junk around in the designated vignette space until I get a pleasing arrangement. Sometimes this happens quickly, and sometimes it takes a while. Sometimes it may even take a trip to a junk shop for the right piece, however, now that I have been putting together junk vignettes for a while now, I usually have the right pieces.
The most important rule with junk gardening or outdoor junk vignettes is that your yard and garden should be well maintained, manicured, mowed, clipped, etc. If your yard looks overgrown and junky before you start you will not end up with a pleasing junk garden vignette, you will end up with a JUNKYARD vignette. Big difference.
I raked up a small flower bed on the side of my deck and added mulch. I used Scott's Nature Scapes Deep Forest Brown.
I am making this a container garden vignette, so I like to cover my bed with mulch first. After I evened off the mulch with a rake, I stepped on it and stamped it down, so less of the mulch can blow away.
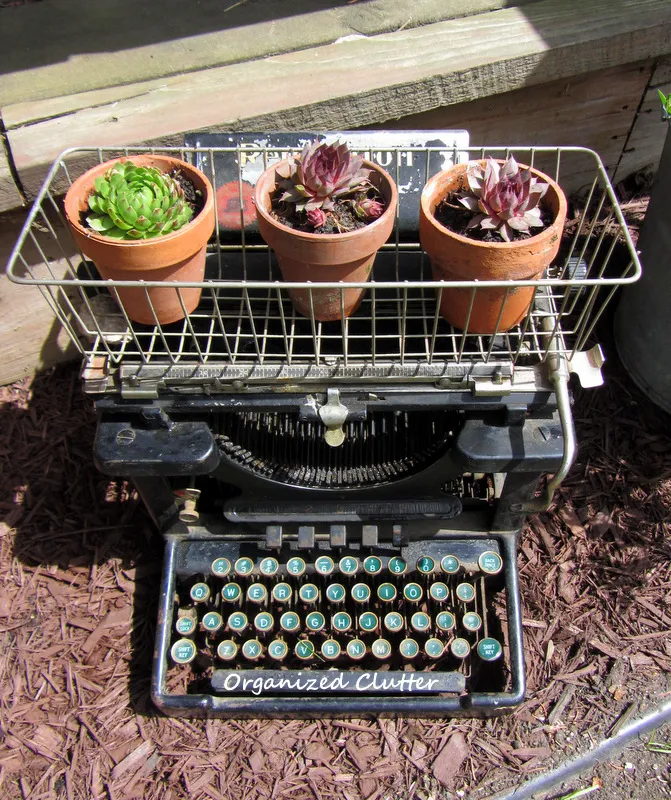
I was lucky enough to pick up this great typewriter this week for $10 thrifting!
Another new junk garden piece this year, is this old wooden box, I purchased at a flea market for $5. I have drilled drainage holes in the bottom.
I put two Techno Heat Lobelia in the middle two partitions, and rocks in the rest. I nailed a rusty 1955 Minnesota license plate to the lid.
This junk was originally from a knife sharpening contraption that was my grandpa's. It has been in several junk gardens before, and you may recognize it. The terracotta pot and the pulleys are planted with Sempervivum, and the pot on the gear is planted with Angelina sedum.
I wasn't sure whether I should plant succulents right in the typewriter or not (like I had seen on Pinterest), but this wire basket fit so perfectly on top, I decided to go with terracotta pots in it.
Also worked into this vignette is my washboard planter. To see how I made it, click here.
So this half of the vignette has white alyssum in the washboard planter, and an orange colored Diascia in the terracotta pot. Sempervivum are planted in the pots on the typewriter, and an orange colored calibrachoa and a techo heat lobelia are planted in the scrub bucket. This area gets part sun.
A large spruce tree shades a portion of this area in the afternoon.
The plants all have some growing to do.
I am so happy to be outside creating with junk and flowers again!

Sharing is caring


Love your gardens. So right that the had needs to be well maintained first.
ReplyDeleteLove the washboard planter.
ReplyDeleteI love this! What a great idea.
ReplyDeleteBrenda
Your garden art is great.
ReplyDeleteLove seeing things get a new purpose.
Denise
I would really love to see the same area once the plants have grown into their space a bit. It looks cool now but I think it will look fantastic as it grows through the summer.
ReplyDeleteGreat tips on a junk garden Carlene. Love it all, but I would treasure that beautiful typewriter and protect it from the weather.
ReplyDeleteEnjoy your gardens ... you have such beautiful plants.
Hugs,
Audrey Z.
Oh how fun that all looks , I like the rusty wheel the clay pot is sitting on and the hen & chicks
ReplyDeleteI sure love what you do with a day off, Carlene! Your garden is looking amazing! This post is a true win... beautifully illustrated! Featuring you tonight on Party Junk. :)
ReplyDeletecarlene, you bring new meaning to Junk! How in the world did you find all these neat items? We don't have any "junk shops" around us that I know of..we used to go to auctions but not anymore. I'm trying to get DH to get rid of his old fashion handsaw that he hasn't used in many years. I keep telling him people buy those and paint scenes on them and sell them for $100 at craft shows but he won't believe me. There's several places enroute to the part of Pa. that we go to visit relatives that I'd love to stop and look around but we always seem to be on timed schedule when we go up there and it's a 3 hr. drive. Your blog is making me look at junk differently but I could never put it together like you have. I agree with Audrey, I would have never put that old Royal typewriter outside..Why not inside in a office vignette?Like on a desk or console table, even a sofa table?
ReplyDeleteCould you take pictures and share with all the flowers are in full bloom? Bet when the flowers are in full bloom, nobody knows they are planted in "Junk".or collectibles. I'd love to see how everything fills in. Thanks for sharing. Your "junk"garden is inspirational!
ReplyDelete